
Hello Folks,
Just thought I would pop in to wish you all a very merry Christmas, lots still going on here with regards to crafting but nowhere near complete for me to show you any, will do an update in the New Year of all what I have been up to. Do have a great time, hope Santa brings you lots of lovely goodies, take care of yourselves and have a great one, lol until next time. xx
Thursday, 23 December 2010
Friday, 17 December 2010
Thank Crunchie its Friday

Hello Folks,
We had a light dusting of snow last night but its started again, bang goes my idea for this weekend.
Oh well never mind, I have been pottering around this morning after buying all the ingredients last night for my fudge and have made 3 batches of vanilla fudge. Not bad for the first time trying this receipe which is out of the River Cottage Everyday book.
Makes 35-40 small squares can use receipe to make other fudge just omit the vanilla
300g caster sugar, 1 tablespoon golden syrup, 100g unsalted butter cut into chunks, 100ml double cream and 1 teaspoon vanilla extract
Using a few drops of sunflower oil lightly oil a banking dish etc 15 x 22cm (I used a glass dish)
Put the sugar, syrup, butter and cream in a heavy-based saucepan, making sure it is not more than a third full, as the mixture will bubble up when it boils. Heat gently, stirring all the time, until the sugar has completely dissolved - tip the pan to make sure there are no crystals still visible on the base.
Stop stirring, put a sugar thermometer in the pan (I do not have one so guessed) and turn up the heat. Let the mixture boil hard until it reaches 116C (soft-ball stage). This may happen quite fast, or take 15 minutes or more, depending on the heat of your hob and the conductivity of your pan - so keep a sharp eye on ther thermometer. Take the pan off the heat and leave to stand for 10 minutes.
Add the vanilla and beat, vigorously until the mixture thickens, becomes slightly grainy and starts to come away from the base of the pan. This can take up to 10 minutes, so you might want to use an electric whisk (dont over whisk, I did with my first batch - still usable but not so pliable). Tip into the prepared dish, smooth the top with a metal spoon and leave to cool.
Mark it into squares with a small, sharp knife while its still slightly soft, then leave for 3 or 4 hours to firm up completely. Remove from the dish and store in an airtight container.
The picture is at the stage of cooling in my glass dish, hope you might give it a go, until next time do take care, lol
Thursday, 16 December 2010
Brrrrr a bit chilly here, raining though
Hi Folks,
Sorry not much going on, have been updating my layout on the blog but other than that not much otherwise. I will admit I still do have christmas cards half made, just can not get my act together, maybe tomorrow will be better as I still would like to make some fudge for my mum. Until next time do, take care, lol
Sorry not much going on, have been updating my layout on the blog but other than that not much otherwise. I will admit I still do have christmas cards half made, just can not get my act together, maybe tomorrow will be better as I still would like to make some fudge for my mum. Until next time do, take care, lol
Monday, 13 December 2010
Hair Style hahahaha!


Hi Folks,
Just thought I would pop in with a couple of pics, sorry its not easy it take pics of oneself and its not possible to take it from the front as it does not show the colour.
I have had deep purple hair pieces put in on saturday, the gothic me again, mind you its better than complete pillar box red.
Hope you are all doing well, take care of yourselves, until next time, lol
xx
Sunday, 12 December 2010
My First Bag Card


Hi Folks,
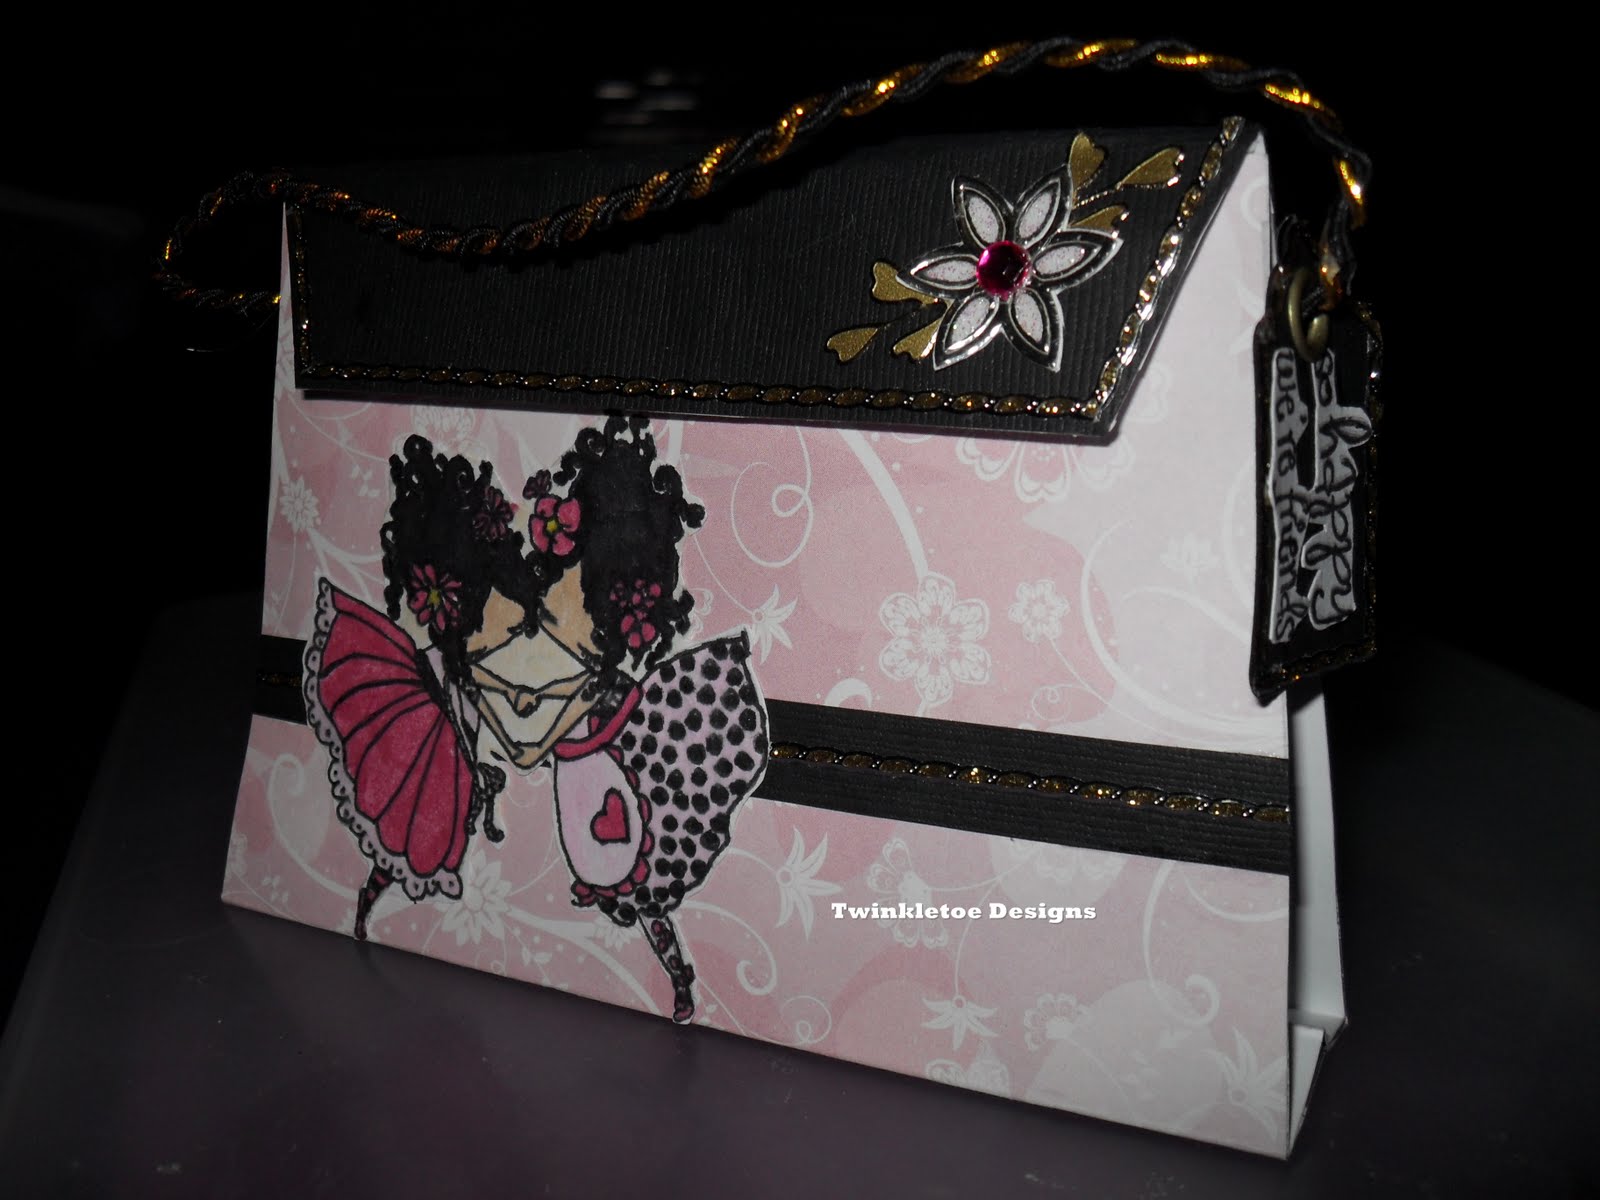
As promised one more gift posting, I have finally finished something different for me, a bag card.
Using the template I have drawn and cut bag from white care, score along the dotted lines as indicated on the template. Mountain fold the third score line down from the top, then valley fold the remaining three score lines. Fold up the botton section of the bag so the gusset section sits on the work surface then bring the top flap over the top of the front of the bag to create the basic bag shape.
Cover the bag by drawing and cutting template from patterned paper. Score and fold as before then wrap around the white bag and glue in place.
Cover the flap at the top of the bag with black card wrapping a little around the back for neatness. Edge the front of the flap with gold decorative border peel-offs as shown.
Cut a 1cm wide strip of black card and fix across the bottom of the front of the bag. Add a decorative border peel-off to the centre of the strip then trim the ends of the border and black card flush with the edges of the bag.
I have then added a stamped image to the front of the bag and coloured in, also I have added a flower peel-off with leaves to the flap of the bag for decoration including a gem stone for the flower centre piece.
I have then cut a tag shape from black card stock, edged with gold border peel-offs and added sentiments, punched a hole in the top of the tag and added 2 pieces of twisted elastic thread for the strap and finally glued to the inside of the back of the bag. I have also added magnetic clasps for the bag flap but you could use velcro.
Inside lefts you plenty of space for sentiments etc.
I do so hope you might give this a try and until next time, take care and happy crafting, lol
Subscribe to:
Posts (Atom)


