
Hello Folks,
Just thought I would pop in to wish you all a very merry Christmas, lots still going on here with regards to crafting but nowhere near complete for me to show you any, will do an update in the New Year of all what I have been up to. Do have a great time, hope Santa brings you lots of lovely goodies, take care of yourselves and have a great one, lol until next time. xx
Thursday, 23 December 2010
Friday, 17 December 2010
Thank Crunchie its Friday

Hello Folks,
We had a light dusting of snow last night but its started again, bang goes my idea for this weekend.
Oh well never mind, I have been pottering around this morning after buying all the ingredients last night for my fudge and have made 3 batches of vanilla fudge. Not bad for the first time trying this receipe which is out of the River Cottage Everyday book.
Makes 35-40 small squares can use receipe to make other fudge just omit the vanilla
300g caster sugar, 1 tablespoon golden syrup, 100g unsalted butter cut into chunks, 100ml double cream and 1 teaspoon vanilla extract
Using a few drops of sunflower oil lightly oil a banking dish etc 15 x 22cm (I used a glass dish)
Put the sugar, syrup, butter and cream in a heavy-based saucepan, making sure it is not more than a third full, as the mixture will bubble up when it boils. Heat gently, stirring all the time, until the sugar has completely dissolved - tip the pan to make sure there are no crystals still visible on the base.
Stop stirring, put a sugar thermometer in the pan (I do not have one so guessed) and turn up the heat. Let the mixture boil hard until it reaches 116C (soft-ball stage). This may happen quite fast, or take 15 minutes or more, depending on the heat of your hob and the conductivity of your pan - so keep a sharp eye on ther thermometer. Take the pan off the heat and leave to stand for 10 minutes.
Add the vanilla and beat, vigorously until the mixture thickens, becomes slightly grainy and starts to come away from the base of the pan. This can take up to 10 minutes, so you might want to use an electric whisk (dont over whisk, I did with my first batch - still usable but not so pliable). Tip into the prepared dish, smooth the top with a metal spoon and leave to cool.
Mark it into squares with a small, sharp knife while its still slightly soft, then leave for 3 or 4 hours to firm up completely. Remove from the dish and store in an airtight container.
The picture is at the stage of cooling in my glass dish, hope you might give it a go, until next time do take care, lol
Thursday, 16 December 2010
Brrrrr a bit chilly here, raining though
Hi Folks,
Sorry not much going on, have been updating my layout on the blog but other than that not much otherwise. I will admit I still do have christmas cards half made, just can not get my act together, maybe tomorrow will be better as I still would like to make some fudge for my mum. Until next time do, take care, lol
Sorry not much going on, have been updating my layout on the blog but other than that not much otherwise. I will admit I still do have christmas cards half made, just can not get my act together, maybe tomorrow will be better as I still would like to make some fudge for my mum. Until next time do, take care, lol
Monday, 13 December 2010
Hair Style hahahaha!


Hi Folks,
Just thought I would pop in with a couple of pics, sorry its not easy it take pics of oneself and its not possible to take it from the front as it does not show the colour.
I have had deep purple hair pieces put in on saturday, the gothic me again, mind you its better than complete pillar box red.
Hope you are all doing well, take care of yourselves, until next time, lol
xx
Sunday, 12 December 2010
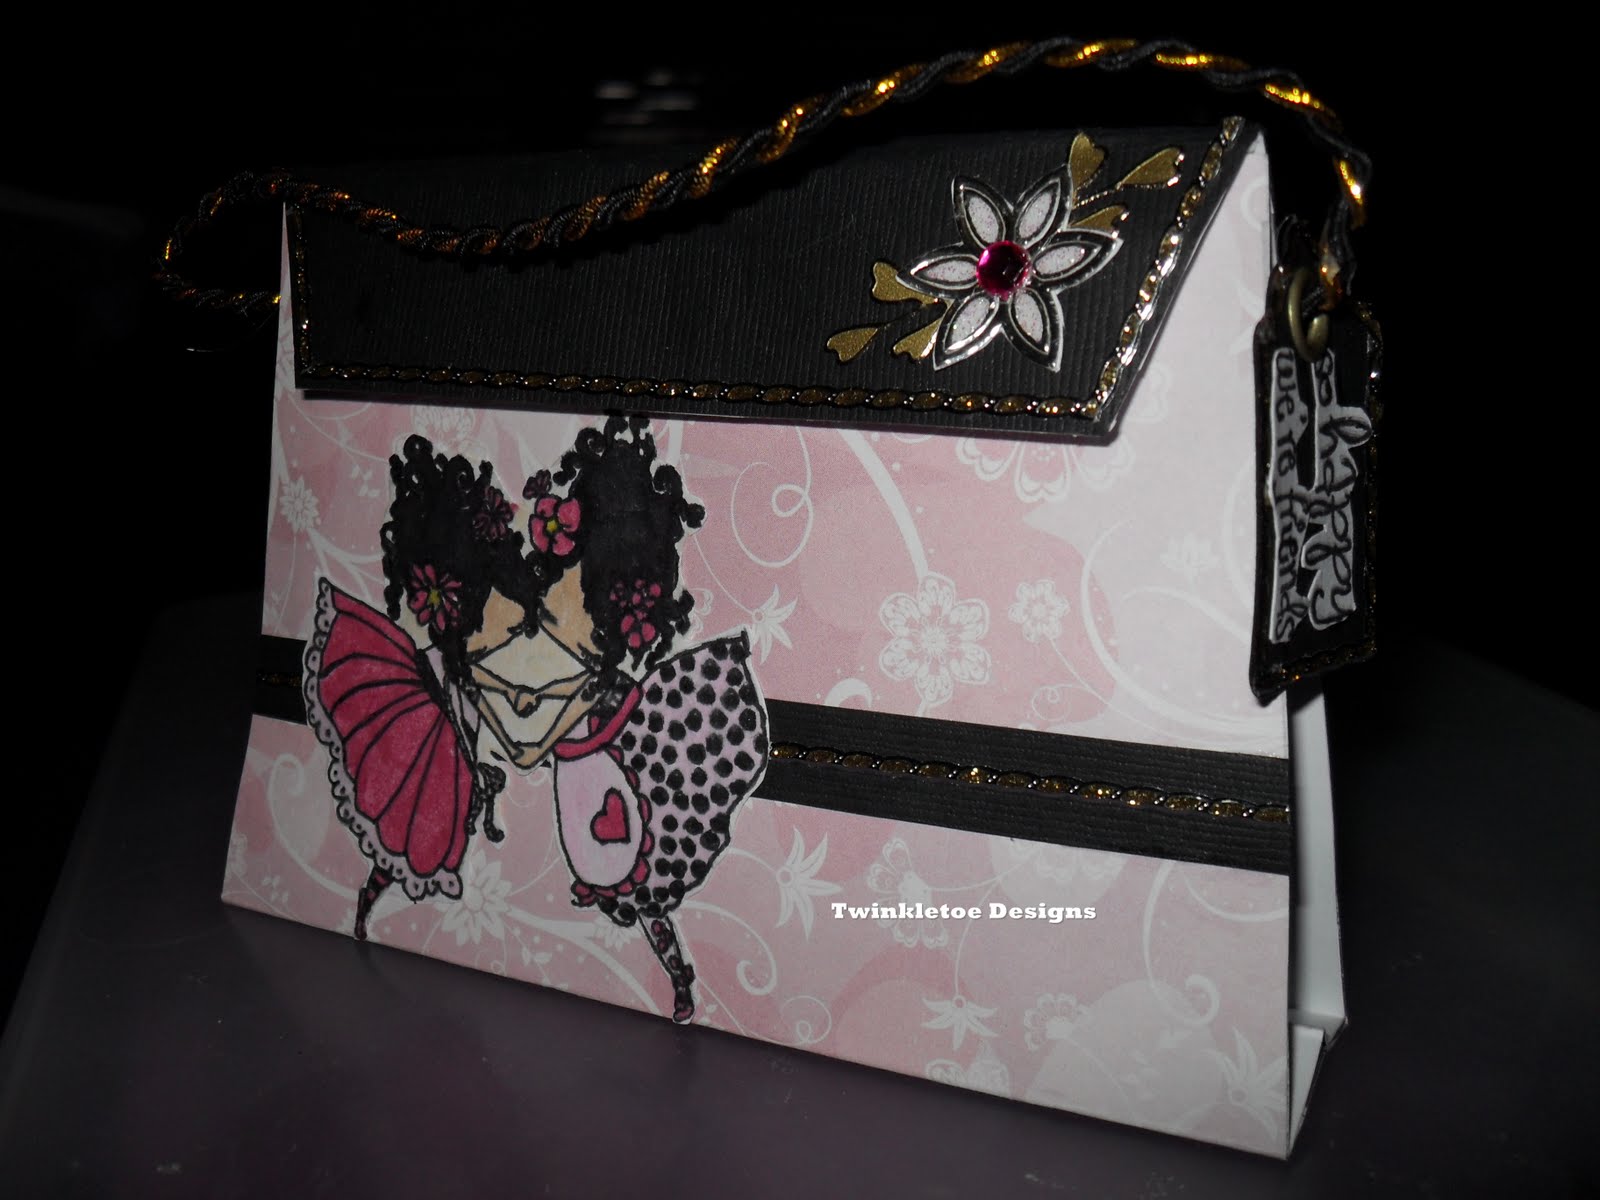
My First Bag Card


Hi Folks,
As promised one more gift posting, I have finally finished something different for me, a bag card.
Using the template I have drawn and cut bag from white care, score along the dotted lines as indicated on the template. Mountain fold the third score line down from the top, then valley fold the remaining three score lines. Fold up the botton section of the bag so the gusset section sits on the work surface then bring the top flap over the top of the front of the bag to create the basic bag shape.
Cover the bag by drawing and cutting template from patterned paper. Score and fold as before then wrap around the white bag and glue in place.
Cover the flap at the top of the bag with black card wrapping a little around the back for neatness. Edge the front of the flap with gold decorative border peel-offs as shown.
Cut a 1cm wide strip of black card and fix across the bottom of the front of the bag. Add a decorative border peel-off to the centre of the strip then trim the ends of the border and black card flush with the edges of the bag.
I have then added a stamped image to the front of the bag and coloured in, also I have added a flower peel-off with leaves to the flap of the bag for decoration including a gem stone for the flower centre piece.
I have then cut a tag shape from black card stock, edged with gold border peel-offs and added sentiments, punched a hole in the top of the tag and added 2 pieces of twisted elastic thread for the strap and finally glued to the inside of the back of the bag. I have also added magnetic clasps for the bag flap but you could use velcro.
Inside lefts you plenty of space for sentiments etc.
I do so hope you might give this a try and until next time, take care and happy crafting, lol
Monday, 29 November 2010
2 more Xmas Cards


Hi Folks,
I know I say the previous blog would probably be my last for this year, well its not folks, amidst the making of minces pies, rhubarb and gooseberry crumbles etc I have managed to make 2 more cards and am rather pleased with myself. Seem to be very productive at the mo after lets see making 36 mince pies, several crumbles, pickling eggs and onions and also made 2 christmas cakes without anything else and am hoping to make one my crafting item but we will see on that matter.
I have used one of Loretta's previous challenge layouts for these 2 cards, I have used white card stock to make the square cards, black card stock, red card stock, 2 co ordinating backing papers per card, sentiments, various gem stones, flowers, cuttlebug, spellbinders scalloped shape and a lovely Whiff of Joy image.
A nice easy card to make, so hopefully I might be back again this week or maybe you never know next week, until then do take care of yourselves and happy crafting, lol
Wednesday, 24 November 2010
LMC NO 107


Hi Folks,
This will probably be my last batch of crafting until the New Year as I still have things to do before Christmas re baking etc and so to my last challenge which is Loretta's last for this year too.
I have ended up making 3 cards for this challenge but I did start out just making one which truly follows the challenge and that is the birthday card.
I have used white card stock to make square cards, 2 shades of card stock for each card, 2 co ordinating backing papers for each card, sentiments, various gem stones, flowers, brads and images. The two christmas cards are using Whiff of Joy images and the birthday card is using Limited Edition Sugar Nellie stamp for Charity and that is why I have chosen it as I was thinking of all those people who for some reason are ill, lonely or just never had anything let alone understand what Christmas means to the rest of us lucky ones. So I have dedicated it to all of those people in hope that their lives will improve some what, peace and goodwill to all.
Hope you all enjoy these and until next time do take care and happy crafting, lol
Thursday, 18 November 2010
Calenders - 5 of 5


Hi Folks,
Here's the final post folks at last.
I have used white card stock for the backing and calender strips, 2 different shades of card stock for each month, one backing paper for each month, cuttlebug, embossing folder swiss dots, various card candies, various gem stones, punch for flowers and some lovely images
Picture of all three calenders together
Picture of a small calender front sheet (still needs year put on it) *
Picture of my front calendar sheet *
* Front Sheet Image Reflective by Sugar Nellie
Hope you like them and until next time, do take care and happy crafting, lol
Calenders - 4 of 5


Hi Folks,
Here is number 4 post as promised.
I have used white card stock for the backing and calender strips, 2 different shades of card stock for each month, one backing paper for each month, cuttlebug embossing folder swiss dots, various card candies,various gem stones, punch for flowers and some lovely images.
Jan 2011 Image Tree Fairy by Kraftin' Kimmie
Feb 2011 Image It's A Girl Thing by Sugar Nellie
March 2011 Imge Spring's Back by Sarah Kay
Off to do the last post of the day and week, lol
Calenders - 3 of 5


Hi Again,
Here's the third post of my calenders folks.
I have used white card stock for the backing and calender strips, 2 different shades of card stock for each month, one backing paper for each month, cuttlebug embossing folder swiss dots, various card candies, various gem stones, punch for flowers and some lovely images.
April 2011 Image Sunshine & Apples by Belles & Whistles
May 2011 Image Fragile Beauty by Home Grown for Sugar Nellie
June 2011 Image Hello Sunshine by Ladybug and Friends
Off to do the next post, lol
Calenders - 2 of 5


Hi Folks,
As promised I am back with the next batch of pages.
I have used white card stock for the backing and calender strips, 2 different shades of card stock for each month, one backing paper for each month, cuttlebug embossing folder swiss dots, various card candies, various gem stones, punch for flowers and some lovely images.
July 2011 Image Jenny at the Beach by A Passion For Stamps
Aug 2011 Image Sisters by Belles & Whistles
Sept 2011 Image Rian by SCACD
Off to do the next post, lol
Calenders - 1 of 5


Hi Folks,
As promised I am back with the calender which I have just finally finished at last and all I need to do is on the 2 small ones put the year on the front sheet. So this is 1 of 5 posts.
I have made 3 calenders, 2 half A4 (gifts) and another one of half A4 but with long date strips for me as I like to write reminders on them and because of this there is 2 layouts to make it easier.
I have used white card stock for the backing and calender strips, 2 different shades of card stock for each month, one backing paper for each month, cutttlebug, embossing folder swiss dots, various card candies, various gem stones, punch for flowers and some lovely images.
Oct 2011 Image Little Witch with Broom By Belles and Whistles
Nov 2011 Image Cool Ride by Whimsy
Dec 2011 Angel Wishes by Home Grown for Sugar Nellie
Off to do the next post, lol
Monday, 15 November 2010
LMC NO 106

H Folks,
Hope this finds you all well, think I am losing the plot, being spread too thin I think, what with crafting, xmas - crafting, cooking etc,Facebook, blogging, plus Vamp Wars, Vamp Darkside, many other fb groups, family and now being asked to be admin (plus computer wiz kid) for a group on fb, yikes! Looks like its getting round for some reason that I am good with computers, dont know where people get that idea, hahahaha!
Oh well, its nice to be in demand but oh help me if I cant solve a computer issue on fb as I really dont know anything about groups and the running of them. All right yes, I do know how to write programs in basic and binerary, over 20 years of input, emails, internet and other bits and pieces but mainly its learn as I go folks and I do love helping others but its getting a bit worrying when someone messages me and says its a private group why is it showing up on the wall and such like, ohhh lord what have I got myself into.
Sorry,enough stressing out folks, just panicking, lol. Well I started this card last week and have finally finished it today for Loretta's challenge. I have used a medium sized rectangle card, with deep purple card stock, green card stock, 3 co ordinating backing papers, sentiments, cuttlebug, spellbinders shapes, sentiments, card candy, several flowers and a lovely Magnolia image called Bubbling Tilda.
Hope you like this one and am hoping to be back again this week with my calenders, fingers crossed that the fb group does not have any more panic stations so I can finish them, until next time, do take care and happy crafting, lol
Wednesday, 3 November 2010
LMC NO 105


Hello Folks,
Bit slow lately but here is two cards I made yesterday for Loretta's challenge.
I have used white card stock to make the square cards, 1 coloured card stock per card, 2 co ordinating backing papers per card, various gem stones, snowflakes, sentiments, buttons/brads and 2 rubber stamped images. A nice, quick and easy challenge if you needed to make lots in a hurry.
Until next time, do take care and happy crafting, lol
Tuesday, 26 October 2010
Baby Card

Hi Folks,
Here's what I made yesterday afternoon, one of our neighbours recently gave birth and so I thought I would make a card for her to welcome both mom and baby home.
I have used a rectangle card, two different coloured card stocks (have tried to keep it neutral colours as do not know the sex of the baby at mo), one backing paper, one ribbon, sentiments, card candy, cuttlebug, embossing folder swiss dots, ribbon slider die cut and the lovely image Mother with Toddler by Whiff of Joy.
I thought it was rather sweet and I hope you agree with me, until next time, do take care and happy crafting, lol
Wednesday, 20 October 2010
LMC NO 104

Hi Folks,
It seems that my internet connection is going at snails pace since last Friday, grrrrr, its really cheesing me off now! Well enough moaning, I have made the card for this challenge using one of my new images that my lovely hubbie purchased for me and well the card is going to be for him enough though he does not know it.
I have used a rectangle card, 2 colours of card stock, 1 backing paper, flowers, card candy, cuttlebug, cuttlebug embossing folder swiss dots, spellbinders shape, sentiments and this gorgeous vintage image.
I do so hope you like it and until next time, do take care and happy crafting, lol
Wednesday, 13 October 2010
3 of 5 Birthday Cards


Hi Folks,
Just thought I would pop in quickly with a few new cards for you to view. I have used the same layout for them.
I have used white card stock to make the square cards, for each 2 colours of card stock, 2 co ordinating backing papers, one ribbon, cuttlebug, 2 spellbinder shapes, flowers, sentiments, card candy and some lovely new images.
I do so hope you like them and here are my 3 favourite ones, until next time do take care, lol
Tuesday, 5 October 2010
LMC No 103


Well Hi Folks,
Sorry not been around for a while have been suffering with that flu virus, much better now though and have decided to give Loretta's challenge ago.
Have made 2 cards for this, both are experimental ideas, the second on is with a Dreamweaver stencil so need more practice I am afraid, not used to light boxes. I have used a small rectangle card, deep red card stock, white card stock, 2 co ordinating backing papers, various flowers, card candy, ribbon, sentiments plus the Dreamweaver stencil of bauble baubles.
The first one is a larger rectangle card, bright blue card stock, white card stock, 2 co ordinating backing papers, various flowers, card candy, ribbon, various gem stones, sentiments plus word 'husband' and a rubber stamp free in a magazine called festive baubles which I have stamped 6 times but cut out the baubles on 5 of the images to make a wreath.
As I have said these are only experiments especially the dreamweaver one and until next time do take care and happy crafting, lol
Tuesday, 14 September 2010
LMC NO 102 Revamped

Hi Folks,
Sorry not been around for a while, still trying to work on my calendars, they seem to take ages for me to make but they will be worth it I hope.
Anyway, I took time out from them to make the most rest challenge set by Loretta. I have used a C6 card, two shades of blue card stock, 2 co ordinating backing papers, sentiments, cuttlebug with cuttlebug embossing folder swiss dots, zig zag scissors and a lovely image by Elisabeth Bell which rather sadly went slightly fuzzed when I coloured it in. Since this original post I have revamped it by stamping another one of these images and cutting out the two children and attaching it over the other one and re colouring in.
Well back to those calendars and until next time, do take care and happy crafting, lol
Wednesday, 1 September 2010
LMC NO 101 - My Psychedelic

Well Hi Folks,
I'm back after a short break, refreshed the ole gray matter a bit, just a shame about the weather as I was hoping to visit the beach and have a paddle (probably for the best - would not wish to shock all those lovely folks out there, hehehehe).
Anyway for job of the crafting weekend was this lovely challenge set by Loretta, mind you had a problem with this one as its supposed to include foliage and I know I have some somewhere, but I searched through all my stuff and can I find it no, so will just have to leave it this way and maybe I will come across it later.
I have used white card stock to make a square card, Deep Red/Plum card stock, Pink card stock, Backing Paper , sentiments stamped image, bright coloured flowers, deep coloured card candy in various colours and a lovely image by Stamping Bella.
I wanted to do this challenge in this colours as I was born in the late sixties (oops gives my age away- never mind) and it has always been thought that I was a hippie child because of that, no way. Thats my sister's style who is lets just say a few years older than me, I will admit that I have a few tie dyed items and love older music but I love must music even of today and well I thought it would be fun to do something a bit more in your face.
I do hope you like this one and look forward to hearing what you think of it, do take care and happy crafting, lol
Friday, 20 August 2010
LMC NO 100 B and C


Hi Folks,
I know I am supposed to be on my hols, well I am but my hubbie is doing some maintance on the car and I could not wait to have a play with some of my new images, whoopee!
I have used Loretta's recent layout for two cards but only one is complete to the leter of the challenge re colours cream, beige and brown. I have used white card stock to make square cards, deep green card stock, pale yellow/green card stock, latte card stock, deep brown card stock, 2 co ordinating backing papers for each, ribbons, flowers, gemstones, brads, edge puncher, sentiments and two gorgeous images. The complete challenge I have called Blowing Chocolate Bubbles, got a bad choc craving again and the other one well I will just keep to the images name Diva.
Do so hope you like them and well until next time, hopefully after the bank hols and not before, take care and happy crafting, lol
Tuesday, 10 August 2010
LMC NO 100

Well Hi Again Folks,
As promised I am back with the next of Loretta's challenges, yes its 100 can not believe that is how long these challenges have been going, its gone so quickly and without them I would have had no hope of understanding the layouts and designs of crafting. So here's to you Loretta, thank you so very much.
The challenge for this was to follow the layout and use cream, beige and browns. I have used white card stock to make a square card, cream card stock, brown, card stock, pale pink card stock, 2 backing papers with cream, beige and brown (chocolate if you like, well I do anyway) with a touch of pink in. I have also used 1 brown polka dot ribbon, pink flowers with chocolate gemstones, gold dots, sentiments and one of those lovely Gorjuss Girls images called Up, Up and away ( I will call it Chocs away, yes I have a really bad chocolate need at the moment but there is none in the house, boohoo)
I do hope you like this one, and until next time, do take care and happy crafting, lol
Christmas Gifts


Hi Folks,
Just thought I would quickly pop in today with 2 posts and the first is some of the christmas gifts I have been working on lately, still have the calenders to complete but they are slow going.
I have made a total of 5 Easel Calendar Cards, 3 Heart Shaped Bags and 2 stationery boxes with stationery to go in them. The stationery boxes I have made using my favourite empty box of chocolates (Belguim Seashells, ummmm). I have covered them with backing paper, added some embellishments, taken some stationery paper and envelopes and with a corner stamp, stamped the image on 2 corners, one top and the other opposite bottom. I then have made some small square cards with white card stock and stamped a lovely oriental image on to them, left them like it for the girls to colour how they wish for notelets.
I will hopefully soon have the calendars to show you but that will now be sometime in September but will be back shortly with my next challenge, lol
Saturday, 7 August 2010
Cake Anyone?


Well Hi Folks,
Thought I would pop in just before I dash off to the hairdressers so I can upload these pics for you to perhaps drool over if you like.
These are the 2 cakes I have made for one of my niece's 18th Birthday Party, I have made basic sponge mixes for both, just added cocoa powder to one for chocolate sponge.
The chocolate sponge I have added freshly picked cherries to the base layer, added the next layer topped with fresh double whipped cream and grated chocolate. Finally I have added the top layer with more whipped cream, grated chocolate and some freshly picked blackberries.
The other sponge I have added fresh double whipped cream and strawberry jam. Both I have made loads of times before and have disappeared just as quick, but watch out lots and lots of calories!
Until next time, do take care and happy crafting, lol
Thursday, 5 August 2010
Last Batch of Christmas Cards, Whoopee!


Hi Folks,
At last I have finished my xmas cards apart from 2, one for my hubbie and the other for my dad. Gives me more time for xmas pressies, birthday cards and now hopefully my rather large cross stitch.
I have made 12 cards this week and here are my three favourites. I have used Loretta's layouts other the last couple of years to make them. I have used white card stock to make square cards, coloured card stock, white card stock for embossing, cuttlebug, emossing folders swiss dots and snowflakes, spellbinders scallops, gems, sentiments and some lovely images.
I do hope you like this and until next week as I am now having a wee break, do take care and happy crafting, lol
Wednesday, 4 August 2010
18th Birthday Gift


Hi Folks,
Another busy week here making lots of christmas cards but I have managed to squeeze in the 18th birthday gifts for my niece.
I have made her a lovely gift box full of goodies, plus a heart shaped bag with her birthday card in and also an Easel Calender Card.
To make the Heart Shaped Bag, I used a template from a magazine, white card stock, patterned papper, punches for flowers, ribbon, gem stones and my cropadile.
Until next time, hopefully tomorrow, do take care and happy crafting, lol
Subscribe to:
Posts (Atom)


