Friday 30 July 2010

More Xmas Cards


Well Hello Folks,

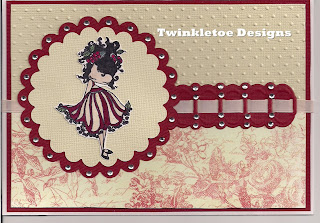
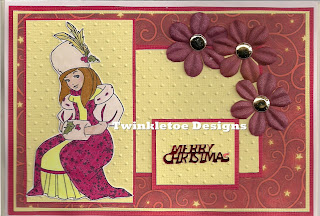
Another busy week here with Christmas cards which I have made 9 of and here are my 3 favs.

I have used white card stock to make the bigger cards, 2 co ordinating coloured card stocks, 1 backing paper. ribbon, ribbon slider, sentiments, cuttlebug, embossing folder swiss dots, spellbinders oval, various images, flowers and candy toppers for flowers.

What will be nice is I have now only to make 12 normal sized cards and 2 bigger ones for Christmas and then I can concetrate on the pressies at last.

So until next time, do take care and happy crafting, lol
Tuesday 27 July 2010

LMC NO


Hi Folks,

Well yesterday and today I have been busy, what with making a couple of sponge cakes, which are now in the freezer ready for filling with cream and such like delicious goodies for one of my niece's 18th Birthday Parties in August and working on the next Loretta's challenge. The challenge is to follow the design layout but also to use soft shades of green for this card in cardstock or backing papers, matting and layering or embellies.

I have used white card stock to make a larger rectangle card, light green card stock, cream card stock, pale green patterned backing paper, cuttlebug, embossing folder swiss dots, flowers in 2 sizes, gem stones and two stamped images one being sentiments.

I am rather pleased with the way this one turned out especially as I really was not certain on the green idea but I did rather enjoy making this one and hope you like it to. Until next time, do take care and happy crafting, lol

Monday 26 July 2010

Batch of Xmas Cards


Hi Folks,

The start of another week and this is 3 out of 9 of the batch of cards I made last week using just one layout for them all.

I have used rectangle cards, for each card I have used 2 different shades of card stock, 1 backing paper, ribbon, sentiments, cuttlebug, embossing folder swiss dots, spellbinders scallops, ribbon slider and a xmas stamped image.

I hope you like this, I quite like this layout and until next time, do take care and happy crafting, lol

Friday 23 July 2010

Blog Candy on the Craft Barn Blog Site


Dreamweaver followers blog candy
Posted: 23 Jul 2010 01:00 AM PDT
Hello everyone!
As promised
(on the newsletter and on this blog earlier this week),
we have a new blog candy especially for you Craft Barn followers
To thank you for your support, you can winthe blog candy below
Everything you need to get started with embossing
over £45 retail value

Our brand new Dreamweaver Stencil and Pastes DVD
One jar of white embossing paste
One palette knife
One roll of magic tape
One Stampendous Glitter
One Cupcakes stencil
One Chrismas tree stencil
.
All you have to do is:
1/ Sign up as a follower
(if you are not one already)
2/ Post this on your blog and link to ours

3/ Add the link to your blog in a comment below
The lucky winner will be announced next Friday
July 30th

Thursday 22 July 2010

HI Folks

Well Hello Folks,

Not been around much do not have anything to show you yet, but am working very hard on some Christmas bits and bobs, well soon have some Christmas cards to show you but not just yet I am afraid.

Hope you are all keeping well, until next time, do take care and happy crafting, lol

Tuesday 13 July 2010

18th Birthday Cards


Back Again Folks,

As promised I am back with 2 other cards, I was inspired by another lovely crafter when looking at their gallery on the docrafts website and decided to give it a try with slight differences. I wanted to make a card for one of my nieces who will be eighteen in August and I thought this layout would be great but could not decide on colours and papers, so thought I would do 2 which would give me a choice.

I have used white card stock to make medium sized cards. One card I have used deep red card stock with cream card stock and a creamy pink ribbon, with a red and cream backing paper. The other I have used I have used lilac card stock stock with pale pink card stock, purple ribbon, with a flowery backing paper. I have used my cuttlebug with swiss dots embossing folder, spellbinders scallop shape nestabilities, Marianne D Ribbon Slider, added various gem stones and another of those lovely images by Stamping Bella which I thought would make a very grown up girlie theme for an 18th Birthday.

I do hope you like these, but I can not choose between them which one to give to my niece and so until next time, do take care and happy crafting, lol

LMC NO


Hello Folks,

I have been busy it seems started making 2 cards yesterday as I was playing with a few new toys that my wonderful hubbie has bought for me. One was a Marianne D Ribbon slider and 3 lovely new images as it has been a while since I have had any new ones and I know that I am extremely lucky for these especially as his job has been a bit on the ho ho side if you get what I mean.

Mind you I did put them to one side today to do Loretta's challenge which is the first that I will upload and then do another post with the other 2 cards as I have finally finished those as well.

For this challenge I have used white card stock to make the a large square card, lilac card stock, cream card stock, purple ribbon, various gem stones round and square, Marianne D Ribbon Slider and one of those lovely images by Elisabeth Bell.

I do so hope you like this one, the colour has gone a little bit strong on scaning it but never mind, I will be back shortly to do the last post of the day, lol

Tuesday 6 July 2010

LMC NO 97


Hello Folks,

Well at least its cooler today, been so hot have not known what to do with myself. I have started this week with Loretta's challenge.

I have used white card stock to make the card, black card stock, striped backing paper, deep pink card stock, cuttlebug, spellbinders shape, various gem stones, sentiments and two lovely images by Magnolia.

Until next time do take care and happy crafting, lol

Thursday 1 July 2010

Another Gatefold Card


Hi Folks,

Hope you are all enjoying the lovely weather, its a bit warm for me, but I am not complaining. I have been working today on another gatefold card.

I have used white card stock for the gatefold card, lilac card stock, backing paper, flowers, brads, sentiments, 1 organza ribbon, cuttlebug, spellbinders tag shape, edge puncher, x cut corner punch and one of those gorgeous girls images called up, up and away.

1) Using two pieces of cardstock cut down to 29.7cm by 17cm. Score at 17cm at one end of each piece.
2) Apply adhesive to the back of one square section of one piece and adhere to the front of the other piece of cardstock; now you have a basic shape gatefold card.
3) Using a roll of tape, shape the top and bottom corner of the flaps of the gatefold card. Mark carefully and lightly with a pencil then cut these sections away.
4) Cover the card with papers. Stamp the image onto cardstock of your choice using ink and colour. Trim, ink the edges and mat onto another piece of cardstock, which has ribbon wrapped around. Adhere topper to card.
5) Cut out shape for sentiments tags, add sentiments, colour edges, layer then punch a hole through the pieces as well as front of card and add with a brad.
6) Flowers and brads for final touches if so wish.

I hope you like this one and until next time, do take care and happy crafting, lol